I wanted to be alerted via Slack when the coffee was finished brewing so I could be sure that I would get coffee. Also, I wanted to work on a small hardware project to have some fun. I had a few hardware pieces from RobotsConf 2014, so figured I’d try getting something working that would fix my coffee notification problem.
The end result is a piece of hardware that sends a Slack message when the coffee has started brewing, and sends another one when the coffee is probably done:

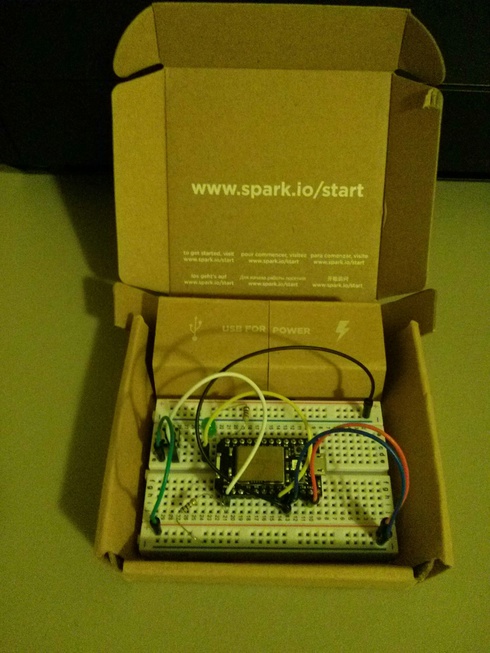
Here is what the hardware ended up looking like in the end:
I’m pretty happy with the process and the result, and wanted to share how I thought about it.
How I went about making it
I figured that I would need some of the following hardware capabilities to make this happen:
- microcontroller for programming the logic
- ability to hit the internet (possibly with a wireless adapter)
- built in breadboard helpful to wire this up as a prototype
One of the boards I had laying around was a Particle Core (formerly Spark Core), and after understanding what it did, it seemed to fit the bill. It has a built-in breadboard, and, even better, an onboard Wi-Fi module. You can set it up to talk with your wireless network through the command line or with a phone app, which is kind of neat. It also has an interesting multicolor LED which signals the current system and networking state.
Early steps
My first step was just to get the thing blinking an LED. I had some experience with Arduino programming, and the Particle Core is programmed in a similar way.
I downloaded some sample code from somewhere, and got a basic LED blink working. The Particle Core has some integrated LEDs, so this was fairly straightforward (just write a certain pin HIGH.)
I didn’t want to have to download an IDE or use a web-based tool to compile the firmware. I read through the Particle docs and figured out how to compile the Particle firmware through a command-line interface by installing the particle-cli NPM package. After some setup hurdles it overall worked pretty well.
Networking
Next, I wanted to hit the network, since that was critical. If I couldn’t do that, I couldn’t send anything to Slack.
I initially had some problems connecting to my local network. The instructions did not seem helpful for resolving the issue, and I even tried the phone app to get things connected. I ended up needing to use 2.4 GHz channel, since the Particle could not talk to a 5 GHz channel. Once that was squared away, I was ready to try to send an actual request.
I pulled in an open-source HTTP library for Particle Core that seemed like it might work. My goal was to hit example.com and print out a response. After some finagling, I was able to log out the response, which meant the network connection was successful.
It took a little while to hook the hardware button I had up so that when I pressed it, a network request would be initiated. I think this was due to the button being small and so there was no documentation or even a readable serial number. I had to search around for a bit until I figured out how the switch was working internally.
A minor setback
At this point, I tried integrating directly with the Slack API. The issue that I ran into was that the HttpClient library doesn’t support HTTPS. This is an important detail because Slack’s API is only available over HTTPS. The issue that I linked to above mentions that a workaround is to post an intermediate server that you control.
At first, I didn’t really like this idea, but then I thought that I could more easily make changes and deploy when the payload and security configuration were on a server that I could control rather than the hardware. The hardware could remain basic and the server could contain more of the sending logic.
So I spun up a Heroku instance and pointed the Coffeebot at a simple Node server running on it. I tested by creating a private Slack room that I didn’t invite anyone else to, so that people wouldn’t get annoyed by the testing I had to do to get it working.
I ended up using some emoji the Coffeebot’s image and called it “Drippy”. I think this gave it a bit of a fun feeling. :)
Source code
There are two repositories:
My memory is not that strong, so thankfully I documented things pretty well in the spark-coffee repository. Also, having decently atomic commits even when I knew I was going to throw the code away was useful when tracing the evolution of the project. In my opinion, people underrate commits as project documentation and history.
Schematic
I don’t have a shareable schematic, but if there is an easy way to make something like this, I would consider spending a few minutes on it.
Overall impressions
It was easier than I thought to get everything working. I really like having integrated Wi-Fi support; it was nice to not have to deal with the complexity of integrating with a Wi-Fi USB module.
It would be interesting to be able to send commands to Coffeebot from Slack. We could integrate more sensors like temperature or volume to figure out remotely whether we will need to brew more coffee soon or not.